Friday, June 10, 2016

Part-custom, part-overall

Members of one guild I belong to make quilts to give to injured service personnel. Most of these quilts are made of red, white and blue fabrics, but some are made with other color choices. We hope this cheerful quilt will make some soldier very happy.

Before considering designs, I auditioned threads and decided on Superior So Fine #510. This aqua  looks good on all the fabrics and it contrasts nicely on the yellow backing. Something organic seemed the obvious choice for an overall, so I set out to quilt a vine.

I always look for ways to add custom touches to any quilt. This approach is what I call part-custom, part-overall. It's a way to boost an overall design without too much extra effort. I started quilting leaves and swirly tendrils, and when I got to the flower-print fabric, I outlined the flowers and echoed them, and then resumed quilting leaves.

When I got to the darkest blue fabrics, I freehanded some other flowers.

Lastly, the back of the quilt is a wholecloth -- two great sides to say thank you so much for your service. 


Tuesday, June 7, 2016

Treasured chests

This is a quilt for a little girl. My client asked for custom, but basic quilting. So, I ditch quilted around the mermaids and between the border and backgrounds, I'm doing swirls in the background, curls in the hair, starfish details in the stars, waves in the green triangles, clamshells in the bodies, but then I became stuck ... how am I going to quilt these little mermaids? Specifically, their little mermaid chests?
Two ideas came to mind: Quilt a heart or a seashell there. I'm leaning toward hearts because they'll be fast, simple and sweet, more what the client requested. I can easily freehand those, too. If I were to do a seashell, I'd need to pick just the right one (that patch is 3 inches wide, so it can't be too detailed), size it with a proportion wheel, go to a copy shop and enlarge or reduce the pattern, line it up for the machine's laser ... it would slow things down considerably, take up more time and raise the price.

Plus, the more cute the quilt, the greater the chance the quilt won't get used -- at least that's been my experience. And I want kids to love their quilts into rags.

If anyone has other ideas for such a space, I'd love to hear them.

In the photo below, see the adorable backing fabric, with seahorses and octopuses and little schools of fish. Now, those would be great motifs to put in the white backgrounds if all-out custom quilting were the order of the day. 

j

Thursday, March 10, 2016

Old Yeller

This much white space cries out for showy quilting, and I had a field day on this huge quilt. I thought double cross hatching the background of  the applique blocks would be really good, but shortly after I started, I was intoning, "What was I thinking?" It was an unbelievable amount of work! It's a rare day when the client says I can mark her quilt top, and I was eager to try out Blue Line Eraser. The directions say not to mark heavily, and I didn't think I was, but it took repeated applications to get the marks out. And the fabric miraculously didn't bleed. I opted for Hobbs wool batting so I'd get a trapunto effect without all the work. And gosh, this was so much work. But it's a wholecloth on the back, and that's always worth it. And here is a detail shot of the border.  

Friday, July 5, 2013

Engraved invitation for trapunto

Recently, a fellow longarm quilter told me she could not imagine using trapunto on any of her customers' quilts, nor has she ever been asked to do so.


Well, I see such opportunities all the time! No, my clients have never asked for it, but consider: People who don't quilt focus only on piecing, not on quilting, so why would they ask for it? It's up to the quilter to point out the possibilities.

 When this quilt crossed my path, trapunto was the first thing that came to mind. To my eyes, this is a wholecloth with applique and a couple of borders. The background is pieced, but it's still one big background that I needed to fill up with something. And the quilt is so simple, it literally needed another dimension.
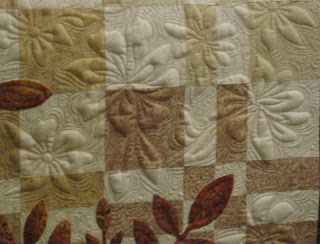
So I set to work freehanding flowers like those depicted in the border print in various sizes. For this quilting, I used a tan cotton thread. The color was going to contrast somewhere no matter what color I used, so I picked a medium tone. And I trapuntoed the actual flowers in the border, with a shiny bronze polyester.

I quilted veins in most of the appliqued leaves with green thread. I quilted pumpkin seeds (also called orange peel or teacup) in the inner border.
For background quilting, I put tiny crescents in the body of the quilt, and I meandered in between the border flowers with black metallic thread, to catch the light. In the center of the applique, I quilted little flowers.
The idea for the quilt came from a book called Pick-A-Pattern Applique. Bonnie, my client, cut one applique piece to simplify the design and save herself the work of cutting individual stems and leaves. Look for her quilt in the Trinity Valley Quilters' Guild show in late September.

Yes, trapunto is more trouble, more time-consuming and more costly than typical quilting, but any effort that is really imaginative and sets your work apart from the herd is worth it.

Friday, May 31, 2013

Pretty in Peach and Brown

 
A light, solid backing produces a wholecloth -- true back art. 

This beautiful carpenter's star is one of those quilts that is intended to be a gift, but we'll see if it actually is given. Sometimes clients change their minds after they see the quilting. I love the way this turned out, my client Janice just loved it, and so did everyone who saw it at guild. One of the perks of my job is the ensuing hug from a happy client upon seeing her quilt.

Part of what makes this quilt is the absolutely gorgeous design in the background. It's the Feathered Fan in Irena Bluhm's book, Blooming Background Designs. The Feathered Fan works equally well as a tiny background fill and as a large overall design. I tried it a few months ago on a large quilt with really simple piecing, and it was done in no time. So for this quilt, I thought I'd do a fast, freehand, no-big-deal quilting scheme. On a smaller scale, here as a medium meander, it was more time-consuming. And I had more stops and starts fitting it into triangles, squares and the border, as opposed to a large and open field. Love it.

In the diamonds, I freehanded flowers and leaves, changing the thread color to a darker peach on the brown fabric.


Janice and her husband, David, make a lot of carpenter's stars. The piecing method they like uses half-square triangles, which makes for quick assembly. At the Arlington show this month, I found a similar pattern minus the center LeMoyne star. Hmmmmm, wouldn't that be a wonderful place for some really showy quilting?

So I came home and flipped through a coffee table book of 19th-century quilts and found wonderful inspiration for a new quilt. It features broderie perse applique in the center, surrounded by 25 little carpenter's stars and about as many alternate blocks: ample room for lots and lots of showy quilting, like a wholecloth with some piecing. I didn't need another idea for another quilt, please, but I'm not complaining. I'm already pulling fabrics (it'll be really scrappy) and pondering trapunto designs, and I'm cutting true diamonds. By the time it's done, I will have mastered Y-seams.


Wednesday, May 1, 2013

Fair isle fun

 I don't see this kind of quilt every day. It looks like a fair isle sweater! And I'm a big fan of red and white. It came during the winter, which was also a creative dry spell for me. I had no ideas. I put straight, radiating lines and continuous curves in the white fabric and came to a screeching halt. My client, Betty, wanted the quilting to look like intricate knitting and she suggested various interwoven straight-line designs, which I rejected. (I have a few achilles' heels.) Finally, she ran across the idea of creating "ribbing" at the top and bottom by stitching lines 3/8" apart and doing tiny, dimensional quilting in between every other row. See the detail shot, below.


In between some of the large snowflake blocks, I quilted little snowflakes with white heavy decorative thread.

I sprinkled snowflakes around either side of the quilt in various sizes. Some are partials. I used some stencils, which I marked with chalk. For the rest, I used cookie cutters, and I freehanded some based on crochet patterns. I've been collecting snowflakes for some time now.


For the rest of the quilt, I still had no ideas. But when a quilt doesn't talk to me, that means it wants straight lines. I know, it's weird, but there you are. I follow my intuition. I learned early on to go with the first idea that pops into my head -- or else. When I didn't, I always had a lot of ripping to do. And when no idea sprang forth, straight lines were the way to go. Now, I'll do almost anything to keep from crosshatching, but that seemed to fit here. It took forever, there were a zillion stops and starts, but it looks wonderful, front and back. And if custom quilting was ever worth it, it was in this quilt.  


Thursday, April 4, 2013

Wholecloth workshop offering

If you've ever wanted to learn the basics of making a wholecloth quilt, I have an opportunity for you.

I will be speaking to the Granbury Quilters Guild on Monday evening, April 15, 2013, at St. Francis Cabrini Catholic Church, 2301 Acton Highway in Granbury, Texas. The meeting begins at 7 p.m. My topic is Quilting With Imagination, which is what I try to do every day on the job. I will also be teaching a workshop the following Saturday, April 20, from 10 to 4 at the same venue. A sample of the 25x25 project is shown at right. We will be doing trapunto, and I will just be guiding you through the process. The class is $40 for members, $50 for non-members, and the kit is $15.
I don't think trapunto is difficult; it just involves extra steps, a little audacity and the courage to cut away batting without slicing into the top fabric. Be brave, for the payoff is huge: Trapunto can enhance a quilt and raise its appraisal value, it can keep applique from appearing deflated, it can help gorgeous border prints stand out, it can help a quilt win ribbons, and the dimension can take up the slack in a wavy top. This kind of thing is what I love most about custom quilting -- all that light and shadow, depth and drama.

The center is a stencil design, the flowers, leaves and feathers are my own freehanded designs, and the background quilting designs are negotiable -- this way everyone can have a customized project. This class is for quilters who already know how to do free-motion work and want to stretch their abilities. It's not a longarm class per se. Bring a really good domestic machine. To sign up, contact Mary Beth Miller at www.millersmountainretreat.net 

If you can't make the class, but you'd like to learn how to do this, get copies of Trapunto by Machine and Exploring Machine Trapunto, written by Hari Walner.